Auto-Deploy Frontend Project
Tutorial based on auto-deployment of VitePress
Prerequisites
Install & Configure Nginx
To configure the default site, edit the file /etc/nginx/sites-enabled/default:
In my case, the site root is set to /var/www/html/.
Nginx Configuration Example
server {
    listen 80 default_server;
    listen [::]:80 default_server;

    # SSL Configuration
    #
    # listen 443 ssl default_server;
    # listen [::]:443 ssl default_server;
    #
    # Note: You should disable gzip for SSL traffic.
    # See: https://bugs.debian.org/773332
    #
    # Read up on ssl_ciphers to ensure a secure configuration.
    # See: https://bugs.debian.org/765782
    #
    # Self-signed certs generated by the ssl-cert package
    # Do not use them in a production server!
    #
    # include snippets/snakeoil.conf;

    root /var/www/html;

    # Add index.php if using PHP
    index index.html index.htm index.nginx-debian.html;

    server_name _;

    location / {
        # First attempt to serve request as file, then
        # as directory, otherwise show a 404.
        try_files $uri $uri/ =404;
    }
}
Install Rsync on Linux
Follow the instructions to install rsync on your system:
Install Rsync Command on Ubuntu, Debian, CentOS, Fedora
To install on Ubuntu/Debian:
sudo apt install rsyncTo check the installation:
rsync --versionYou should see an output like:
rsync version 3.1.3 protocol version 31Set Up GitHub Workflow
You can either create a workflow directly within the GitHub project, or manually create a .github/workflows folder and add a new .yml file.
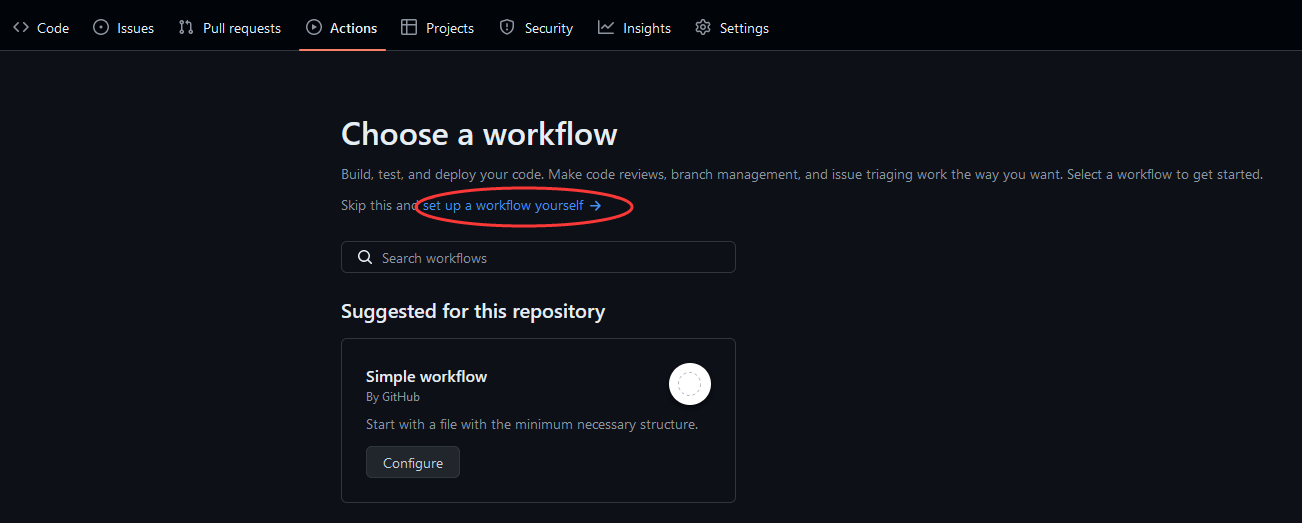
Example GitHub Workflow Code
# Sample workflow for building and deploying a VitePress site to GitHub Pages

name: Deploy VitePress site to BWH

on:
  # Runs on pushes targeting the `main` branch. Adjust if using `master`.
  push:
    branches: [master]

  # Allows manual triggering from the Actions tab
  workflow_dispatch:

jobs:
  build:
    runs-on: ubuntu-latest  # Environment for the workflow

    steps:
      - name: Checkout repository
        uses: actions/checkout@v4
        with:
          fetch-depth: 0  # Required if lastUpdated is enabled in VitePress

      - name: Set up Node.js
        uses: actions/setup-node@v4
        with:
          node-version: 20
          cache: npm

      - name: Install dependencies
        run: npm ci

      - name: Build with VitePress
        run: npm run docs:build

      - name: Deploy to Server
        uses: easingthemes/ssh-deploy@main
        with:
          SSH_PRIVATE_KEY: ${{ secrets.SSH_PRIVATE_KEY }}
          ARGS: "-avz --delete"
          SOURCE: "docs/.vitepress/dist/"
          REMOTE_HOST: ${{ secrets.REMOTE_HOST }}
          REMOTE_PORT: ${{ secrets.REMOTE_PORT }}
          REMOTE_USER: ${{ secrets.REMOTE_USER }}
          TARGET: "/var/www/html/"
          SCRIPT_BEFORE: ls
Set Up SSH Permissions
On the Server
The SSH private key for a Linux instance is typically stored in the user's home directory under a .ssh folder. The key used for connecting to your instance is often the one you created or downloaded when setting up SSH access (e.g., id_rsa).
The private key is usually stored in
~/.ssh/:- For most users, the home directory is located at
/home/username/, whereusernameis the name of your user account. - For the root user, it’s usually
/root.
- For most users, the home directory is located at
To check where
~points to, run:bashecho ~To navigate to the
.sshfolder:bashcd ~/.sshOnce inside the folder, look for the private key file, typically named
id_rsa(unless you specified a different name).
- Private key:
id_rsa - Public key:
id_rsa.pub
- If you don't have an SSH key pair, you can generate one using
ssh-keygen:
ssh-keygen -t ed25519TIP
If you're on a legacy system that doesn't support Ed25519, use RSA instead:
ssh-keygen -t rsa -b 4096This will generate the SSH key. Press Enter when prompted to save the key in the default location (~/.ssh/).
To allow SSH access, copy the public key (
id_rsa.pub) to theauthorized_keysfile on the server.Ensure the user has the necessary folder permissions to synchronize files.
On GitHub
- Add the necessary secrets in the GitHub Project Settings.
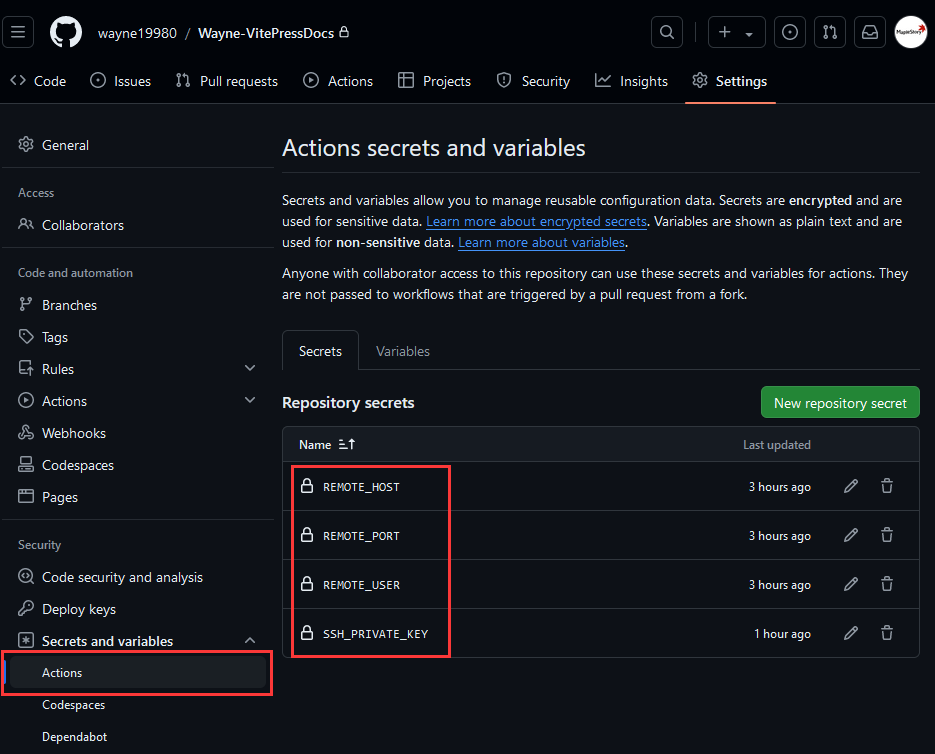
Push Changes to GitHub
Once everything is set up, push your changes to the GitHub repository. The workflow will trigger automatically, and within a minute or so, your website will be deployed and live.
References
References
The Best Way to Deploy Your Static Website - Wolfgang's Channel
GitHub Actions Website Deployment Template
Github Action 部署项目到服务器
Alternate 1:使用 GitHub Actions 直接跑 SSH 命令
Setting up Continuous Deployment for a vue app on a VPS using Github Actions
Sample Code
name: Deploy to Staging

on:
  push:
    branches:
      - development
jobs:
  build:
    runs-on: ubuntu-latest

    steps:
      - uses: actions/checkout@v3

      - name: Copy repository contents to remote server via scp
        uses: appleboy/scp-action@master
        with:
          host: ${{ secrets.HOST }}
          username: ${{ secrets.USERNAME }}
          port: ${{ secrets.PORT }}
          key: ${{ secrets.SSHKEY }}
          passphrase: ${{ secrets.PASSPHRASE }}
          source: "."
          target: ${{ secrets.TARGET }}

      - name: Executing remote command via ssh
        uses: appleboy/ssh-action@master
        with:
          host: ${{ secrets.HOST }}
          username: ${{ secrets.USERNAME }}
          port: ${{ secrets.PORT }}
          passphrase: ${{ secrets.PASSPHRASE }}
          key: ${{ secrets.SSHKEY }}
          script: |
            cd ${{secrets.TARGET}} && npm install
            printf "%s" "${{secrets.STAGING_ENV}}" > "${{secrets.TARGET}}/.env.staging"
            npm run build:staging
Alternate 2: Node Script
使用GitHub Actions和GitHub pages实现前端项目的自动打包部署 - 当时明月在曾照彩云归 - 博客园效能工具之前端自动化部署打包发布上传脚本(五)命令行加载、上传进度功能
Details
const path = require("path");
const fs = require("fs");
const Client = require("ssh2-sftp-client");

const ora = require("ora");
let spinner = null; // 加载实例

const config = {
  host: "666.777.888.999",
  port: "7527",
  username: "root",
  password: "passwordForLunix",
};

let totalFileCount = 0; // 本地dist文件夹中总文件数量
let num = 0; // 已成功上传到远端服务器上的文件数量

// 统计本地dist文件夹中有多少个文件(用于计算文件上传进度)
function foldFileCount(folderPath) {
  let count = 0;
  const files = fs.readdirSync(folderPath); // 读取文件夹
  for (const file of files) {
    // 遍历
    const filePath = path.join(folderPath, file);
    const stats = fs.statSync(filePath);
    if (stats.isFile()) {
      // 文件就+1
      count = count + 1;
    } else if (stats.isDirectory()) {
      // 文件夹就递归加
      count = count + foldFileCount(filePath);
    }
  }
  return count;
}

// 把本地打包好的dist递归上传到远端服务器
async function uploadFilesToRemote(localFolderPath, remoteFolderPath, sftp) {
  const files = fs.readdirSync(localFolderPath); // 读取文件夹
  for (const file of files) {
    // 遍历
    let localFilePath = path.join(localFolderPath, file); // 拼接路径
    let remoteFilePath = path.join(remoteFolderPath, file); // 拼接路径
    remoteFilePath = remoteFilePath.replace(/\\/g, "/"); // 针对于lunix服务器,需要做正反斜杠的转换
    const stats = fs.statSync(localFilePath); // 获取文件夹文件信息
    if (stats.isFile()) {
      // 是文件
      await sftp.put(localFilePath, remoteFilePath); // 把文件丢到远端服务器
      num = num + 1; // 完成数量加1
      let progress = ((num / totalFileCount) * 100).toFixed(2) + "%"; // 算一下进度
      spinner.text = "当前上传进度为:" + progress; // loading
    } else if (stats.isDirectory()) {
      // 是文件夹
      await sftp.mkdir(remoteFilePath, true); // 给远端服务器创建文件夹
      await uploadFilesToRemote(localFilePath, remoteFilePath, sftp); // 递归调用
    }
  }
}

// 主程序
async function main() {
  const localFolderPath = "./dist"; // 本地dist文件夹路径
  const remoteFolderPath = "/var/www/test/dist"; // 远程lunix的dist文件夹路径
  totalFileCount = foldFileCount(localFolderPath); // 统计打包好的dist文件夹中文件的数量
  if (!totalFileCount) return; // dist是空文件夹就不操作
  const sftp = new Client(); // 实例化sftp可调用其方法
  try {
    console.log("连接服务器");
    await sftp.connect(config);
    console.log("服务器连接成功");
    console.log("删除旧的dist文件夹");
    await sftp.rmdir(remoteFolderPath, true);
    console.log("删除旧的dist文件夹成功");
    console.log("新建新的dist文件夹");
    await sftp.mkdir(remoteFolderPath, true);
    console.log("新建新的dist文件夹成功");
    spinner = ora("自动化脚本执行开始").start(); // loading...
    await uploadFilesToRemote(localFolderPath, remoteFolderPath, sftp); // 耗时操作,递归上传文件
  } catch (err) {
    console.log(err);
  } finally {
    sftp.end();
    spinner.info("自动化脚本执行结束");
  }
}

// 执行脚本
main();